TrxAVR_Picastar setup instructions - 3 - Atmega2560 programming
Programming the ATmega2560
These instructions refer to programming
from Studio 4 using and AVRISP USB programmer.
Other programmers can be used, either using the downloaded hex code or generating
it from source code with
WINAVR/Studio4. See Ponyprog
Install WINAVR and then Atmel Studio 4.
Create a folder somewhere on your PC (in
your Star folder if you wish) and name it trxavr_source.
Unzip C:\Program files\hbradios\hobcat\trxavrcode\trxavr_source_NNN.zip)
into the trxavr_source folder.
If you are using Encoders8,
then create another fodler named encoders8_source.
Unzip C:\Program files\hbradios\hobcat\encoders8code\encoders8_sourceNNN.zip
into this folder.
Start Atmel Studio 4.
Click Menu | File
| Open file
Locate your trxavr_source folder and find TrxAVR.aps.
Click Open
The project wile load with all the files in cascaded pages. - You can maximise
one to tidy the screen.
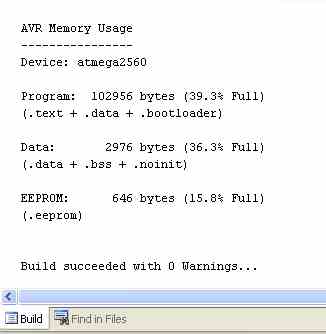
Click Menu | Buiild | Rebuild all
You should eventually see a message bottom
left of the form.
If it says build succeeded with 0 warnings then all is well.
Run windows explorer and look in you trxavr_source
folder. You will a new subfolder named default.
In default you will find TrxAVR.hex and TrxAVR.eep.
If you are using a different programmer (eg: PonyProg) then
you will use this TrxAVR.hex file for programming.
(TrxAVR.eep is internal EEPROM data defined by the source code.
It is not important to load
it because you will later use Hobcat to load the internal EEPROM from trxavreemem.ini
)
Programming
Connect the AVRISP programmer to TrxAVR using a 6way IDC cable and by USB to
the PC.
In Studio4, click Menu | Tools | Program
AVR | Auto connect
The programmer appears:
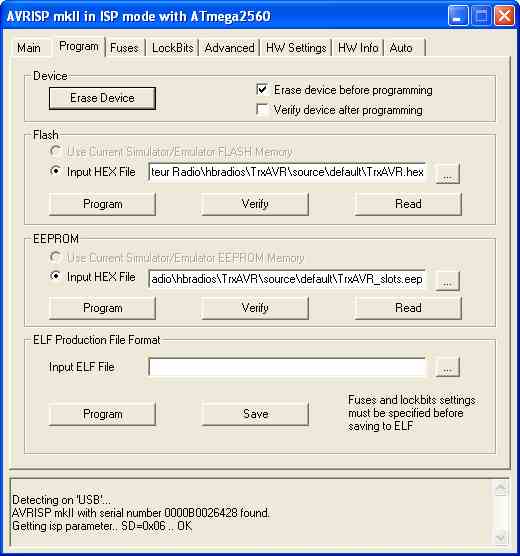
Make sure that the Erase before
programming box is checked.
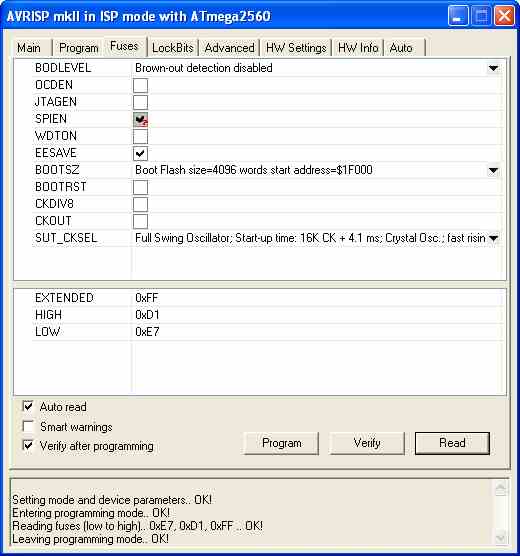
You dont want this to erase the internal EEPROM, so in the Fuses tabe set EESAVE
as shown below.
The hex file automatically defaults to the one you have built (but can be changed).
Click Program in the Flash section to load
the code.
Then, as this is the first time, click Verify to check that
all is well.
There is no need to program the EEPROM. Hobact will do it.
The click the Fuses tab.
This should be configured as show below.
(You must set the SUT_CKSEL as shown, otherwise the clcok oscillator
will not run.)
The Fuses tab has Auto read set and so reads the settings from the ATmega2560
as soon as
you open the tab.
Configure as shown below and then click Program.
*******
Warning: Do not set SUT_CKSEL to an external option. ********
In-situ programming needs
the clock to be running. The ATmega2560 is supplied with
the internal R/C clock oscillator selected - so you can program it. Switching
to internal
oscillator using the 16Mhz crystal allows you to program it. BUT - if
you select a
non-existent external clock source, then you thereafter have no clock and so
you are
effectively locked out. ie: you cant program the chip and so so can't change
back to a
working clock option. To recover from this sitiuation you need to apply an external
clock
signal (eg: from the other ATmega2560 using a piece of wire and a capacitor!)
(The ATmega2560 can be programmed in 'High Voltage
Programming Mode' wihout a clock
running. However, we cannot do this. It needs a special programmer with a parallel
data
interface to the chip.)
After programming or setting fuse, the ATmega2560 will automatically reboot.
If your display is graphics, then the display
will not operate. This is because the default display
is the 20x4 character display. You wont see anything until you set the correct
display type using Hobcat.
TrxAVR-Picastar normally starts with a
Loading DSP code message and a progress bar.
DSP code loading takes about 20 seconds.
If the 24LC512 EEPROM is blank then this loading phase will be bypassed and
the
TrxAVR display will go direct to the working 'home ' state.
The frequency display will be zero because no sticky slots are loaded, and these
include the power on slot.
Classic Picastar has default values for
the 61 sticky F+M slots coded in source code.
TrxAVR doesn't. They have to loaded by Hobcat from trxavreemem.ini
to Atmega2560 internal EEPROM.
This facility to load and save from an INI file allows you to edit the slot
data on the PC.
Programming Encoders8
If you are using Encoders8 (built into TrxAVR-B) then you need to program the ATmega2560 in Encoders8.
In Studio4 , click Menu
| Project | Close project and
then Menu | File | Open
file
Navigate to your encoders8_source folder and open encoders8.aps.
Then build as for trxavrcode above. A subfolder encoders8_source\default
will contain encoders8.hex
Connect your programmer to the Encoders8
board programming socket (or to the Encoders8 programming socket
on TrxAVR-B) and program the Encoders8 Atmega2560 as described above for the
TrxAVR ATmega2560.
Testing the processor
and USB
You should now be able to run and test
the TrxAVR-Picstar code an USB link opration.
Restart TrxAVR-Picastar
Ensure the USB connection from TrxAVR to PC is in place. (I dont mean the programming
conmection)
(Please note that
if the AVRISP USB programmer is conencted to TrxAVR, then it must be powered
by being connected to the PC. Otherwise the ATmega2560 will not run)
Run Hobcat
It will show detection of TrxAVR on the
status bar.
You need to check that TrxAVR-Picastar code is running so that USB communication
is possible.
To do this, click the Debug button in Hocat. The Debug window
will appear and should report the
state of the Atmeg2560's ports and twenty or so variables. The variables are
specified in the TrxAVR code
and so if your can see them, then they have arrived by USB link!
The debug Window is shown below:
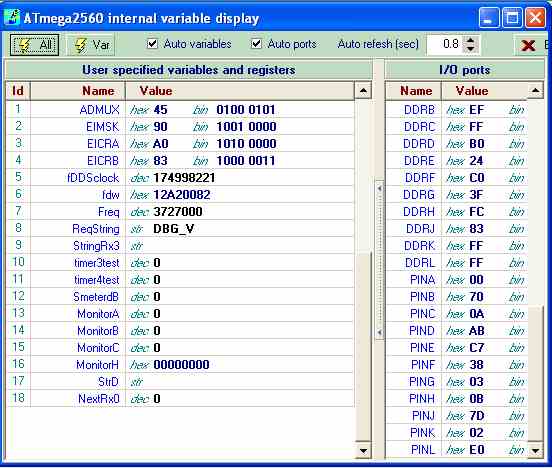
Close the debug window
Timer code - programming
the timer PIC
HobcatSetup.exe installs modified code for Picastar's
Timer baord PIC processor.
The files are stvox04_padis.asm and stvox04_padis.hex.
They are loaded into C:\Program files\hbradios\hobcat\timercode
The modified code uses the hitherto unused RA4 pin to disable PA bias.
If RA4 is low on receive, the bias remains
disabled on switch to transmit.
If RA4 goes low on transmit, the bias is disabled. If RA4 then does high again
the bias will not enable until a switch receive and then back to transmit.
Now move on to Setup 4